
Minicom (Command-line Tool)
Minicom is a command-line tool with no graphical interface. It has a small installation package, consumes minimal system resources, and can be used directly from deepin's Super Terminal window. Minicom is the recommended tool for use.Minicom is mainly used for serial communication. Below is a guide to installing and using Minicom.
Installing Minicom
The method to install Minicom depends on the Linux distribution you are using. For deepin, you can follow these steps to install Minicom:
1、Open the terminal: First, open the deepin Super Terminal.
3、Get root privileges: To install software, root privileges are usually required. You can obtain them by typing sudo su -. The system may ask for the administrator password.
3、Install Minicom using apt-get: deepin and its derivative versions (such as UnionTech UOS) typically use the apt package manager. In the terminal, enter the following commands to install Minicom:
sudo apt-get update # Update the software package list
sudo apt-get install minicom# Install Minicom
This command will download and install Minicom from the deepin software repository. During the installation, the system may prompt you to confirm the installation, type 'y' and press Enter to continue.
Using Minicom
The usage of Minicom mainly involves configuring the serial port and conducting serial communication. Here are the basic steps:
1、Configure the serial port:
a. Start Minicom's configuration tool by entering sudo minicom -s in the terminal. This will open Minicom's configuration menu.
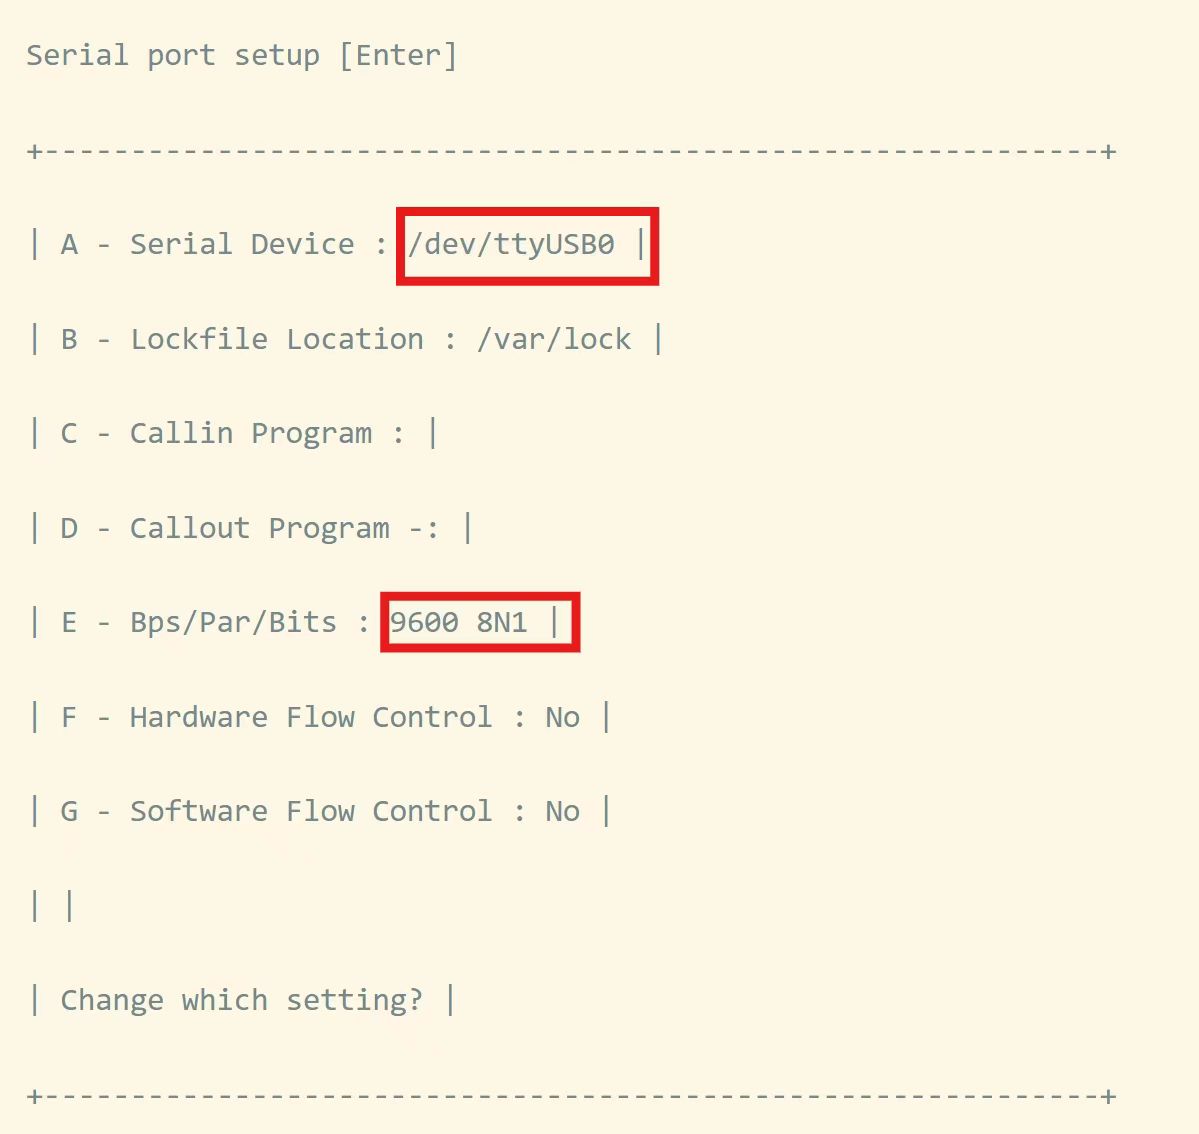
b. Select "Serial port setup" to configure the serial port. You will need to set the correct serial port device (e.g., /dev/ttyS0, /dev/ttyUSB0), baud rate, data bits, stop bits, and other parameters.
c. After configuration, select "Save setup as dfl" to save the default settings, and then exit the configuration menu.
2、Start Minicom: After configuring the serial port, you can start Minicom by entering sudo minicom in the terminal. If the default configuration was saved earlier, Minicom will automatically use those settings.
3、Conduct serial communication: Once Minicom is started, you can begin communicating with the device connected to the specified serial port. You can input commands and view the device's responses. Typically, you will see a familiar device debugging interface, such as a Huawei switch prompting for a user and password.
4、Exit Minicom: To exit Minicom, press Ctrl+A and then press the X key. The system will ask for confirmation to exit, press y to confirm.
Common Minicom Functions (Some Advanced Features)
1、Automatic scrolling: Press Ctrl+A and then press W to enable automatic scrolling, so that when the displayed content exceeds one line, it will automatically wrap to the next line.
2、Clear screen: Press Ctrl+A and then press C to clear the content displayed on the screen.
3、Browse history: Press Ctrl+A and then press B to browse through Minicom's history of displayed content.
4、Send files: Minicom supports sending files through the serial port. The specific method may vary depending on the Minicom version and configuration, but typically requires using specific commands or options.
Notes
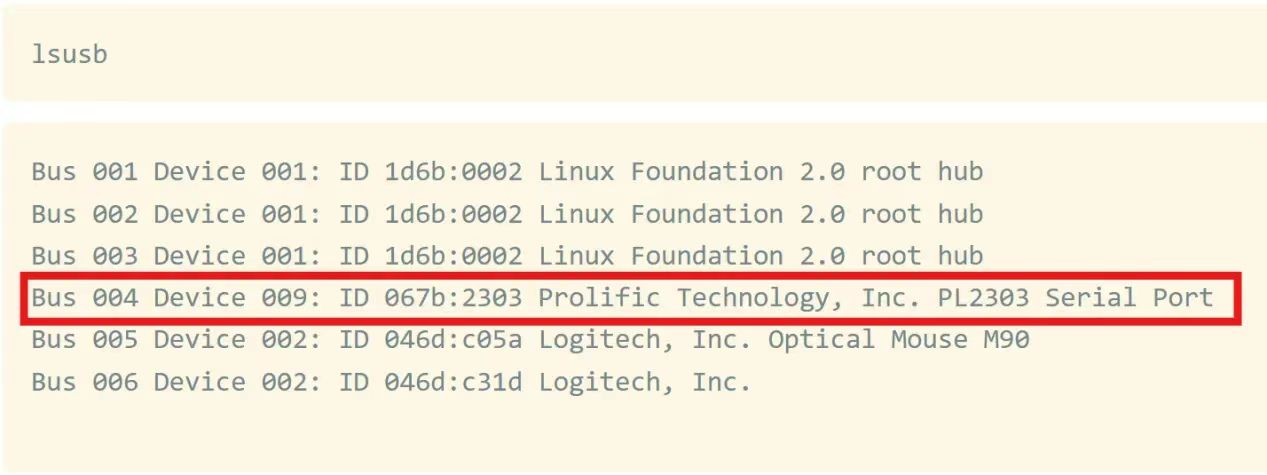
Before using Minicom, make sure you have sufficient permissions to access the specified serial port device. Typically, these device files are located in the /dev/ directory, and root permissions are required to access them. You can check the driver installation as follows:
lsusb # Check if the serial line driver is installed properly. deepin has it installed by default.
cd /dev # Enter the dev directoryls#
Check if the driver for ttyUSB0 exists in the dev directory
Minicom's configuration and usage may vary depending on the Linux distribution and the version of Minicom being used. If you are using another Linux distribution or a different Minicom version, refer to the corresponding documentation or help information.
Cutecom (Graphical Debugging Tool)
Cutecom is another tool that can be used for serial debugging in deepin. Cutecom has a graphical interface, making it similar to tools that users might be familiar with from Windows and MacOS. Follow the steps below to install and use Cutecom:
Installing Cutecom
1、Install using apt-get (for deepin and its derivatives):
a. Open the deepin Super Command Terminal.
b. Install Cutecom by typing the command sudo apt-get install cutecom, and follow the prompts to complete the installation.
If the installation fails, you can run a system update to ensure that the system is up-to-date by typing sudo apt-get update to update your software package list, ensuring the latest version of the software is installed.
Using Cutecom
1、Start Cutecom: After installation, you can start Cutecom by typing sudo cutecom in the terminal. Since Cutecom may need to access serial port devices, you may need to use sudo to gain the necessary permissions.
1、Configure Serial Port Parameters:
a. Find the serial port: Connect your serial device to the computer, and then enter dmesg | grep ttyS (for traditional serial devices) or dmesg | grep ttyUSB (for USB-to-serial devices) in the terminal to find the corresponding serial port name (e.g., /dev/ttyS0, /dev/ttyUSB0, etc.).
b. Set serial port parameters: In the Cutecom interface, click the "Settings" button to enter the settings window. Set the correct serial port name, baud rate, data bits, stop bits, etc. Typically, the baud rate should be set according to your device's manual.
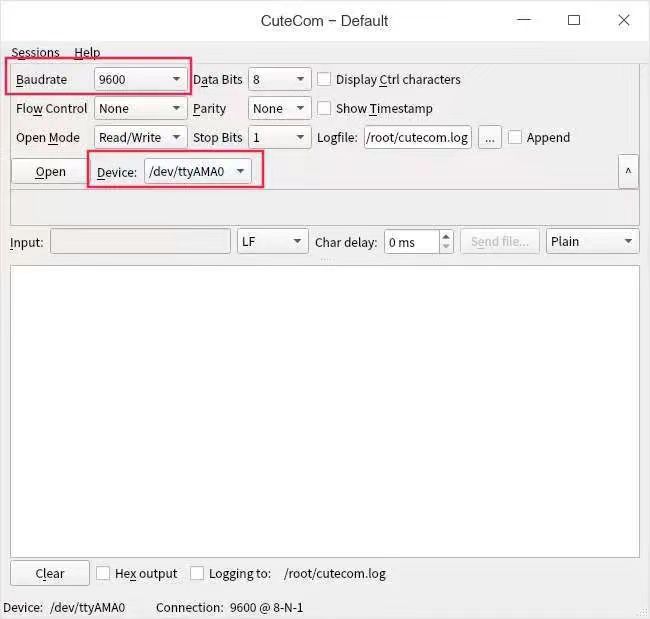
Note: At the top of the window, you can see widgets where you can adjust the serial communication settings. Below this section is the output view, where all the data returned by the device is displayed, including non-printable characters. At the bottom, you can see the input area, where you can input commands using the input line, along with a list showing the history of the input lines.
3、Connect the Serial Device:
Select the serial port: In the "Device" field of Cutecom, choose the serial port name you found using the dmesg command, or manually enter the name.
Open the serial port: Click the "Open Device" button in the upper left corner of the software to connect to the serial device.
4、Send and Receive Data: Once connected, you can send and receive data through Cutecom's interface. Typically, the interface is divided into two windows—the top window displays the received data, and the bottom window is used for inputting data to send.
5、Close the Connection: When you finish serial communication, click the "Close Device" button in the upper left corner of the software to close the current serial connection.
Notes
Before using Cutecom, ensure that your deepin system has the necessary serial drivers installed, and that the serial device is correctly connected to the computer (similar to the operations for Minicom).
If your Linux distribution does not support the apt-get package manager, you may need to search for other installation methods that are suitable for your system.
When using Cutecom for serial communication, make sure you understand the basic principles of serial communication and parameter configuration to avoid communication failures or data loss.
Thanks to deepin Community user "UOS大局观" for the contribution.
Releated Readings:
(1)deepin Full Version ISO (including deepin V15)
(2)deepin Community Monthly Report
Content source: deepin community
Reprinted with attribution